Core Concepts of LangGraph
As AI applications become more sophisticated, a single prompt-response interaction is often not enough to solve real-world problems. Modern AI systems frequently need to perform multiple tasks, make decisions, call external tools, maintain memory, retry failed operations, and coordinate several agents working together. Managing all these moving parts manually can quickly become difficult and error-prone.
This is where LangGraph comes in.
LangGraph is an orchestration framework specifically designed for building intelligent, stateful, and multi-step LLM workflows. Rather than thinking of an AI application as a collection of independent prompts, LangGraph encourages you to think in terms of workflows, where multiple tasks work together to achieve a larger goal.
At its core, LangGraph takes a workflow and represents it as a graph. In graph terminology, the workflow is broken down into smaller units called nodes, and the relationships between those nodes are represented through edges. Each node performs a specific task, while the edges determine how execution moves from one task to another.
For example, imagine you are building an AI-powered research assistant. A user submits a question, and the system must:
- Understand the query.
- Search for relevant information.
- Collect data from multiple sources.
- Analyze the findings.
- Generate a report.
- Review the report for quality.
- Present the final answer.
Although this appears to be a single feature from the user's perspective, it is actually a sequence of interconnected tasks happening behind the scenes. LangGraph allows you to model each of these tasks as individual nodes and then connect them together to form a complete workflow.
A node in LangGraph can represent many different kinds of operations, such as:
- Calling an LLM
- Executing a tool
- Querying a database
- Performing reasoning
- Making a decision
- Validating an output
- Calling another agent
The edges between nodes define how the workflow progresses. After one task completes, the edge determines which task should execute next. Because the workflow is represented as a graph rather than a simple linear sequence, execution can become much more flexible and powerful.
For example, LangGraph can naturally support:
- Sequential execution, where tasks run one after another.
- Parallel execution, where multiple tasks run simultaneously.
- Conditional branching, where different execution paths are chosen based on a decision.
- Loops, where the workflow can revisit previous steps until a condition is satisfied.
- Memory and state management, allowing information to persist throughout the workflow.
- Resumability and fault recovery, enabling workflows to continue from where they stopped instead of starting over.
One way to think about LangGraph is to imagine a flowchart that is not only capable of describing a process but can actually execute that process. You define the workflow visually and logically through nodes and edges, and LangGraph takes responsibility for coordinating execution, passing data between tasks, maintaining state, and ensuring the workflow progresses correctly.
This graph-based approach is one of the primary reasons LangGraph has become popular for building agentic AI systems. Agents rarely follow a strictly linear path. They often need to reason, choose between alternatives, call tools, revisit previous decisions, and collaborate with other agents. Traditional chain-based approaches become difficult to manage in such scenarios, whereas a graph structure represents these complex interactions much more naturally.
In simple terms, LangGraph provides a way to transform complex AI workflows into executable graphs, making it easier to build robust, stateful, and production-ready AI applications.
Common LLM Workflow Patterns
Although every application has unique requirements, certain workflow patterns appear repeatedly in AI systems.
Understanding these patterns will help you recognize why LangGraph exists.
1. Prompt Chaining
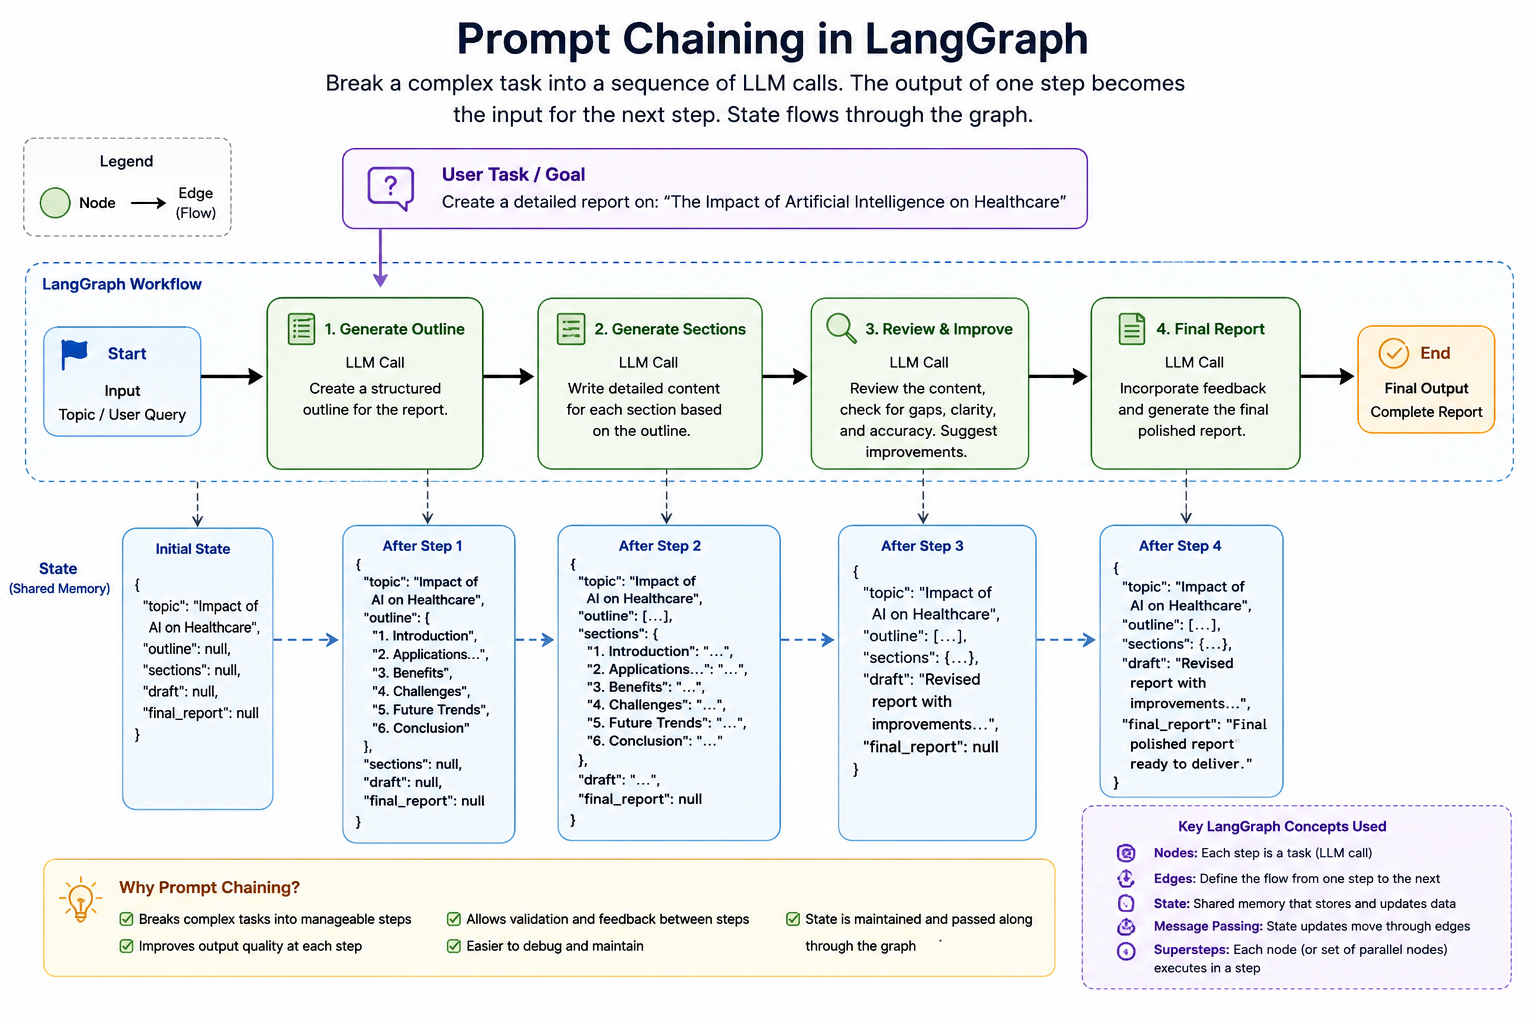
Prompt Chaining is one of the most fundamental and widely used workflow patterns in LLM-based applications. The core idea is simple: instead of asking an LLM to solve a large and complex problem in a single prompt, we break that problem into a sequence of smaller, focused tasks and execute them one after another.
This approach is inspired by how humans typically solve difficult problems. When writing a research paper, preparing a business proposal, or creating a software design document, we rarely produce the final output in a single step. Instead, we first gather information, organize our thoughts, create an outline, expand the content, review the result, and then refine it further. Prompt chaining applies the same philosophy to AI systems.
In a prompt chaining workflow, the output of one LLM call becomes the input for the next LLM call. Each step focuses on a specific responsibility, making the overall workflow easier to manage, debug, and improve.
Why Prompt Chaining Is Needed
Many tasks appear simple on the surface but are actually composed of several smaller subtasks. If we ask an LLM to perform all those subtasks simultaneously, the output quality may suffer because the model must handle too many responsibilities at once.
For example, suppose we want to generate a detailed report about:
"The Impact of Artificial Intelligence on Healthcare"
A single prompt might look like:
Write a comprehensive report on the impact of Artificial Intelligence on Healthcare.
Although the LLM may produce a reasonable answer, it is handling multiple responsibilities simultaneously:
- Understanding the topic
- Identifying major sections
- Organizing the structure
- Generating content
- Maintaining logical flow
- Ensuring completeness
Instead of forcing the model to do everything at once, we can divide the task into smaller stages.
Example: Report Generation Workflow
A prompt chaining workflow for report generation might look like this:
Topic
  ↓
Generate Outline
  ↓
Generate Section Details
  ↓
Generate Final Report
  ↓
Review and Improve Report
In this workflow:
Step 1: Generate Outline
The first LLM receives only the topic and produces a structured outline.
Example output:
1. Introduction
2. Applications of AI in Healthcare
3. Benefits
4. Challenges
5. Future Trends
6. Conclusion
Step 2: Generate Detailed Content
The second LLM receives the outline and expands each section into detailed content.
Step 3: Review the Content
A third LLM call evaluates the generated report for missing information, logical gaps, or inconsistencies.
Step 4: Produce the Final Output
The final version is generated after incorporating improvements.
Each step focuses on a single responsibility, which generally produces better results than a single monolithic prompt.
How Data Flows Through the Chain
One of the key characteristics of prompt chaining is that information flows sequentially through the workflow.
Input Topic
      ↓
LLM Call 1
      ↓
Outline
      ↓
LLM Call 2
      ↓
Detailed Report
      ↓
LLM Call 3
      ↓
Reviewed Report
Notice that each stage builds upon the output of the previous stage.
This creates a natural progression where the system gradually transforms raw input into a polished final result.
Adding Validation Between Steps
Another major advantage of prompt chaining is that we can validate outputs at intermediate stages.
Consider the report generation example.
After the outline is generated, we might want to verify:
- Does the outline contain enough sections?
- Are all required topics covered?
- Is the structure logical?
If validation fails, the workflow can stop or regenerate the outline before moving forward.
Topic
   ↓
Generate Outline
   ↓
Validate Outline
   ↓
Generate Report
Without prompt chaining, such intermediate quality checks would be difficult to implement.
This ability to inspect and validate outputs at every stage is one of the reasons prompt chaining is heavily used in production AI systems.
Advantages of Prompt Chaining
Prompt chaining offers several important benefits:
- Improved output quality because each LLM call focuses on a smaller and more specific task rather than solving everything at once.
- Easier debugging because you can inspect the output of every stage and quickly identify where a problem occurred.
- Better control over the workflow because validation and decision-making can be introduced between steps.
- Greater reusability because individual stages can often be reused in multiple workflows.
- Higher reliability because failures can be detected and corrected before they propagate further through the system.
2. Routing
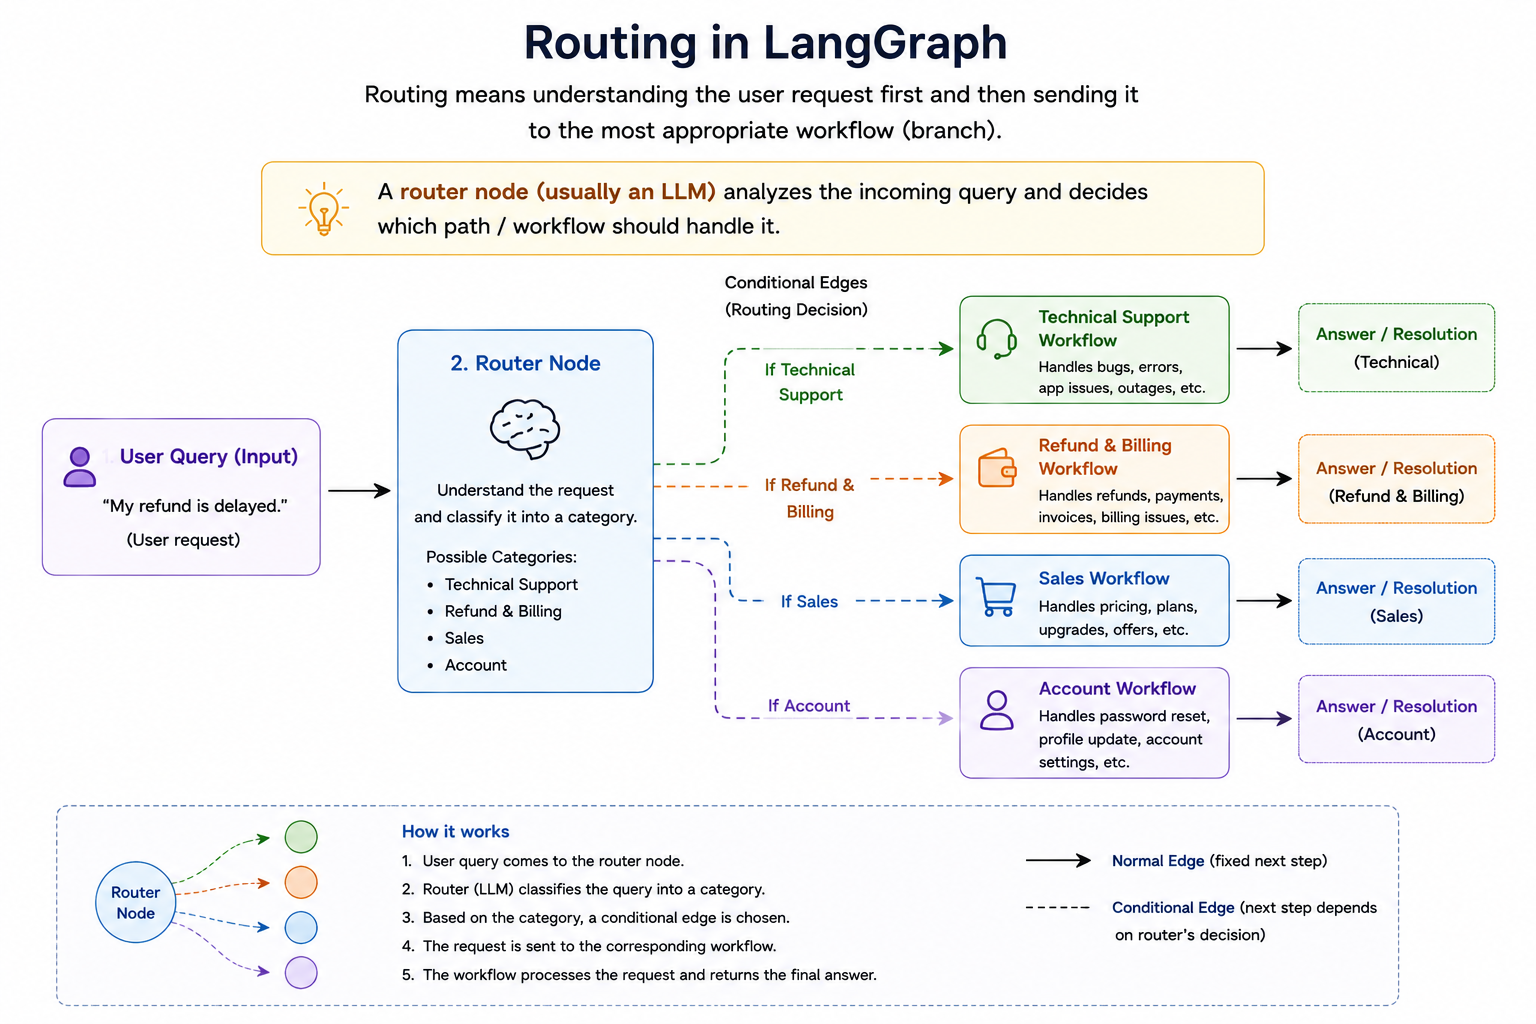
Routing is another extremely important workflow pattern in LLM applications, especially when a system must handle different types of requests that require different expertise, tools, or processing logic. Instead of sending every request through the same execution path, a routing workflow first analyzes the incoming request and then decides which path should be followed.
You can think of routing as the AI equivalent of a receptionist in a large organization. When a customer enters a company, the receptionist first understands the customer's requirement and then directs them to the appropriate department. Technical issues go to technical support, billing issues go to finance, and sales inquiries go to the sales team. The receptionist does not solve the problem themselves; their job is to determine who is best suited to solve it.
A routing workflow follows exactly the same principle. The router receives a request, understands its nature, and forwards it to the most appropriate component in the system.
Why Routing Is Needed
As AI applications grow in complexity, it becomes increasingly difficult to create a single prompt or agent that handles every possible scenario effectively.
Consider a customer support platform.
Users may ask questions such as:
- "My refund has not been processed."
- "The application is showing a database connection error."
- "Can I upgrade to the premium plan?"
- "How do I change my password?"
Although all of these queries arrive at the same chatbot, they belong to completely different domains.
If a single agent tries to handle everything, several problems can arise:
- The prompt becomes excessively large.
- The agent's responsibilities become unclear.
- Accuracy may decrease.
- Tool selection becomes more complicated.
- Maintenance becomes difficult.
Routing solves this problem by separating responsibilities and directing each request to the most suitable specialized workflow.
Basic Routing Workflow
A simple routing workflow might look like this:
User Query
      ↓
   Router
      ↓
 ┌────┼────┐
 ↓    ↓    ↓
Tech Refund Sales
The router's responsibility is to classify the incoming request.
For example:
| User Query | Route Selected |
|---|---|
| "My refund is delayed" | Refund Workflow |
| "The website is showing an error" | Technical Support Workflow |
| "Tell me about your pricing plans" | Sales Workflow |
Once the route is selected, the specialized workflow takes over and handles the request.
How the Router Makes Decisions
The interesting part is that the router itself is often powered by an LLM. The router receives the user query and is asked to classify it into one of several predefined categories.
For example, the router may receive this prompt:
Classify the following query into one of these categories:

- Technical Support
- Refund
- Sales

Query:
"My payment was deducted but my order is not visible."

Return only the category.
The router may return:
Refund
The workflow then automatically forwards the request to the refund-handling branch. This means the router is acting as a decision-making node rather than a content-generation node.
Routing Based on Tool Selection
Routing is not limited to selecting agents. It can also be used to determine which tool should be executed. Imagine a personal assistant application that has access to multiple tools:
User Request
      ↓
    Router
      ↓
 ┌────┼─────┬─────┐
 ↓    ↓     ↓     ↓
Search Calendar Email Database
 Tool    Tool   Tool   Tool
Consider these requests:
| Request | Selected Tool |
|---|---|
| "What is the capital of Japan?" | Search Tool |
| "Schedule a meeting tomorrow" | Calendar Tool |
| "Send an email to the HR team" | Email Tool |
| "Find employee ID 12345" | Database Tool |
The router's role is to determine which tool is most appropriate for the task.
This pattern is heavily used in modern AI agents.
Conditional Branching in LangGraph
From a LangGraph perspective, routing is usually implemented using conditional edges. A node analyzes the current state and returns a decision. Based on that decision, execution follows a different branch.
            Router
           /  |   \
          /   |    \
         /    |     \
     RouteA RouteB RouteC
Unlike normal edges where execution always moves to the same next node, conditional edges allow execution paths to change dynamically based on runtime information.
This is one of the major reasons graph-based workflows are more powerful than simple chains. A chain generally follows a fixed path, whereas a graph can choose different paths depending on the situation.
Advantages of Routing
Routing offers several important benefits:
- Improved accuracy because requests are handled by specialized workflows rather than a single general-purpose workflow.
- Better scalability because new routes can be added without redesigning the entire system.
- Reduced complexity because each workflow focuses on a specific responsibility.
- Better maintainability because individual branches can be modified independently.
- More efficient resource usage because only the relevant workflow executes for a given request.
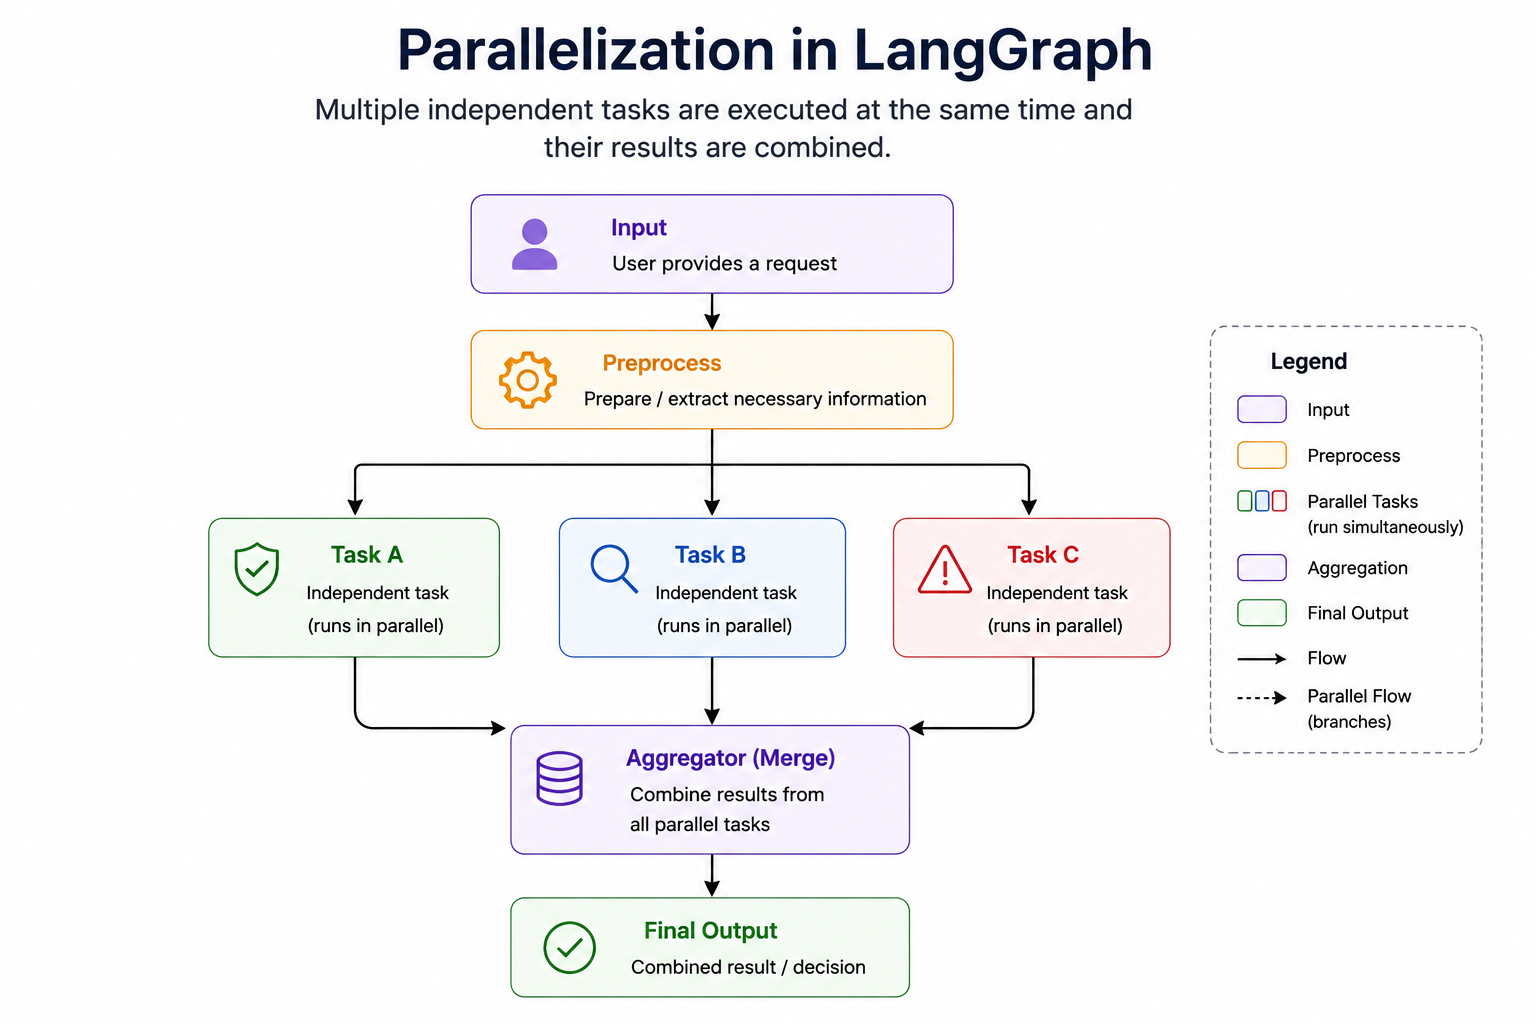
3. Parallelization
Parallelization is a workflow pattern in which a large task is divided into multiple independent subtasks that can be executed simultaneously. Instead of performing one task after another in sequence, the system runs several tasks at the same time and then combines their results to produce the final output.
This pattern is extremely important in AI applications because many real-world problems require multiple analyses that do not depend on one another. If those analyses can be performed independently, there is no reason to wait for one to finish before starting the next. Running them in parallel can significantly reduce overall execution time while also improving the quality of the final result.
Why Parallelization Is Needed
To understand the motivation behind parallelization, consider the difference between sequential execution and parallel execution.
Suppose an AI system must perform three independent checks:
- Safety Analysis
- Fact Verification
- Sentiment Analysis
A sequential workflow would look like:
Input
  ↓
Safety Check
  ↓
Fact Check
  ↓
Sentiment Check
  ↓
Final Result
In this case, the Fact Check cannot start until the Safety Check finishes, and the Sentiment Check cannot start until the Fact Check completes.
However, these three tasks are completely independent. The fact-checking process does not need the result of the sentiment analysis, and the sentiment analysis does not need the result of the safety check.
Because of this independence, the workflow can be redesigned as:
             Input
               ↓
        ┌──────┼──────┐
        ↓      ↓      ↓
   Safety   Fact    Sentiment
   Check    Check   Analysis
        └──────┼──────┘
               ↓
        Final Decision
Now all three analyses execute simultaneously, reducing overall processing time.
The Core Idea Behind Parallelization
The key question to ask is: "Can these tasks be executed independently?" If the answer is yes, the tasks are strong candidates for parallel execution.
Parallelization works best when:
- Tasks do not depend on each other's outputs.
- Each task can operate on the same input independently.
- The final result can be assembled later from multiple outputs.
The workflow generally follows three phases:
Split
  ↓
Execute in Parallel
  ↓
Aggregate Results
This "split-execute-aggregate" pattern is one of the most common designs in large-scale AI systems.
Example: Video Content Moderation
A good real-world example is content moderation for a video-sharing platform. When a creator uploads a video, the platform may need to verify several things before making it public.
The system may need to check:
- Does the video violate community guidelines?
- Does the video contain misinformation?
- Does the video contain harmful or adult content?
These evaluations are independent. A misinformation detector does not need the output of a community guideline checker. A harmful content detector does not need the result of either of the other two checks. Therefore, the workflow can be parallelized.
Uploaded Video
        ↓
 ┌──────┼────────┐
 ↓      ↓        ↓
Policy  Fact     Safety
Check   Check    Check
 └──────┼────────┘
        ↓
 Moderation Decision
Once all three evaluations finish, the results are combined to determine whether the video should be published, flagged, or rejected.
Parallelization and State
Parallel workflows introduce an interesting challenge. What happens if multiple nodes update the same piece of state?
Imagine three parallel nodes all trying to update:
{
    "analysis_results": []
}
Each node wants to add its own result.
Node A → ["Safety Passed"]
Node B → ["Fact Check Passed"]
Node C → ["No Harmful Content"]
If updates are not handled correctly, some results may overwrite others. This is one of the reasons LangGraph introduces the concept of reducers. Reducers define how updates from multiple parallel branches should be combined.
For example:
[
    "Safety Passed",
    "Fact Check Passed",
    "No Harmful Content"
]
Instead of losing information, all updates are preserved and merged together. This becomes especially important in large parallel workflows.
Advantages of Parallelization
Parallelization provides several important benefits:
- Reduced execution time because multiple operations run simultaneously rather than sequentially.
- Improved scalability because additional workers can often be added without changing the overall workflow structure.
- Better utilization of computational resources since multiple LLM calls can be active at the same time.
- Natural separation of responsibilities because each branch can focus on a specific aspect of the problem.
- Higher-quality outputs because multiple perspectives can be analyzed simultaneously before producing a final decision.
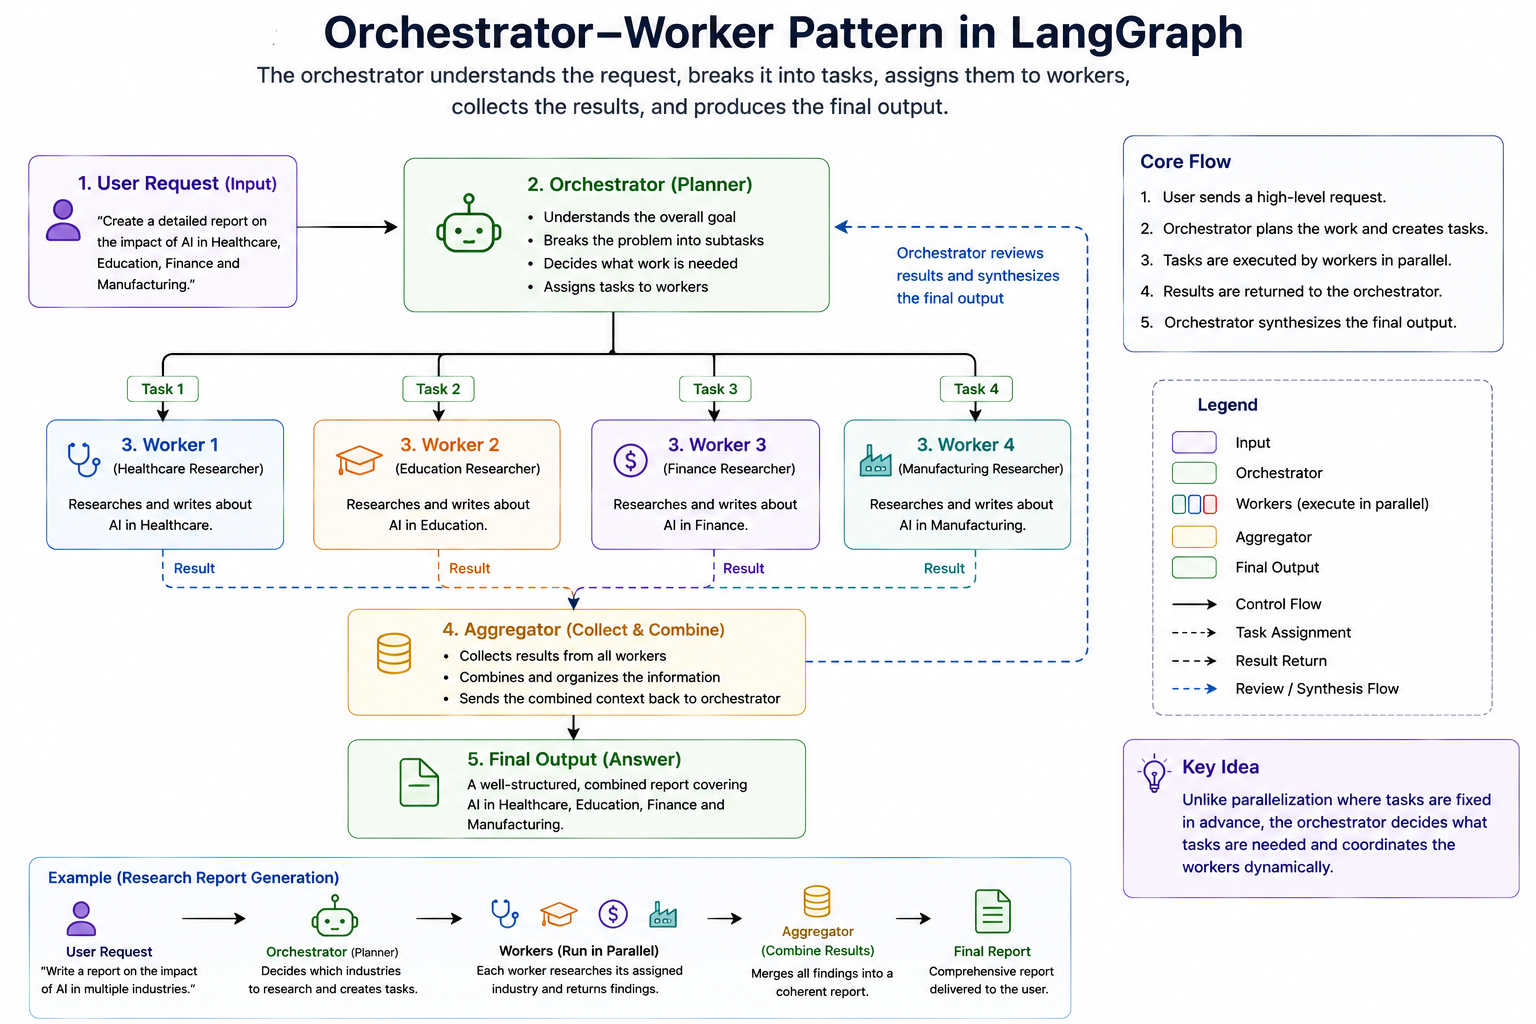
4. Orchestrator-Worker Pattern
At first glance, the Orchestrator-Worker pattern may look very similar to Parallelization because both patterns involve multiple tasks executing independently. However, there is one fundamental difference that makes the Orchestrator-Worker pattern significantly more powerful.
In a Parallelization workflow, the tasks are known beforehand. The workflow designer decides in advance which tasks will run and how many parallel branches will exist.
In an Orchestrator-Worker workflow, the tasks are not necessarily known when the workflow is designed. Instead, a special component called the orchestrator analyzes the incoming request, determines what work needs to be done, creates or assigns tasks dynamically, and then delegates those tasks to one or more workers.
In simple terms:
Parallelization executes predefined tasks in parallel, whereas the Orchestrator-Worker pattern dynamically decides what tasks should exist in the first place.
Understanding the Roles
The workflow consists of two primary components:
Orchestrator
The orchestrator acts as the coordinator. Its responsibilities include:
- Understanding the overall objective.
- Breaking the problem into smaller tasks.
- Assigning tasks to workers.
- Collecting results.
- Producing the final output.
The orchestrator does not usually perform the detailed work itself. Instead, it focuses on planning and coordination.
Workers
Workers are specialized task executors. Their responsibilities include:
- Receiving assigned work.
- Completing the task.
- Returning the result.
A worker focuses on solving a specific piece of the larger problem.
A Simple Analogy
Imagine a construction project. Suppose a company is building a house. The project manager does not personally perform every task.
Instead, the project manager:
- Reviews the requirements.
- Creates a plan.
- Assigns work to specialists.
- Monitors progress.
- Combines all completed work.
The specialists perform the actual work:
- Electricians install wiring.
- Plumbers install pipes.
- Carpenters build structures.
- Painters paint walls.
The project manager acts as the orchestrator, while the specialists act as workers. The Orchestrator-Worker pattern applies the same concept to AI workflows.
Advantages of the Orchestrator-Worker Pattern
This pattern provides several significant advantages:
- The workflow adapts dynamically to different requests instead of relying on a fixed structure.
- Large problems can be decomposed into smaller, manageable pieces automatically.
- Workers can specialize in particular domains or responsibilities.
- The system scales naturally as workload complexity increases.
- The orchestrator maintains a high-level understanding of the overall objective while workers focus on execution.
When Should You Use the Orchestrator-Worker Pattern?
This pattern is most useful when:
- The number of tasks is unknown beforehand.
- Work must be dynamically generated.
- Different requests require different execution plans.
- Specialized agents or workers exist.
- Large problems must be decomposed into smaller subtasks.
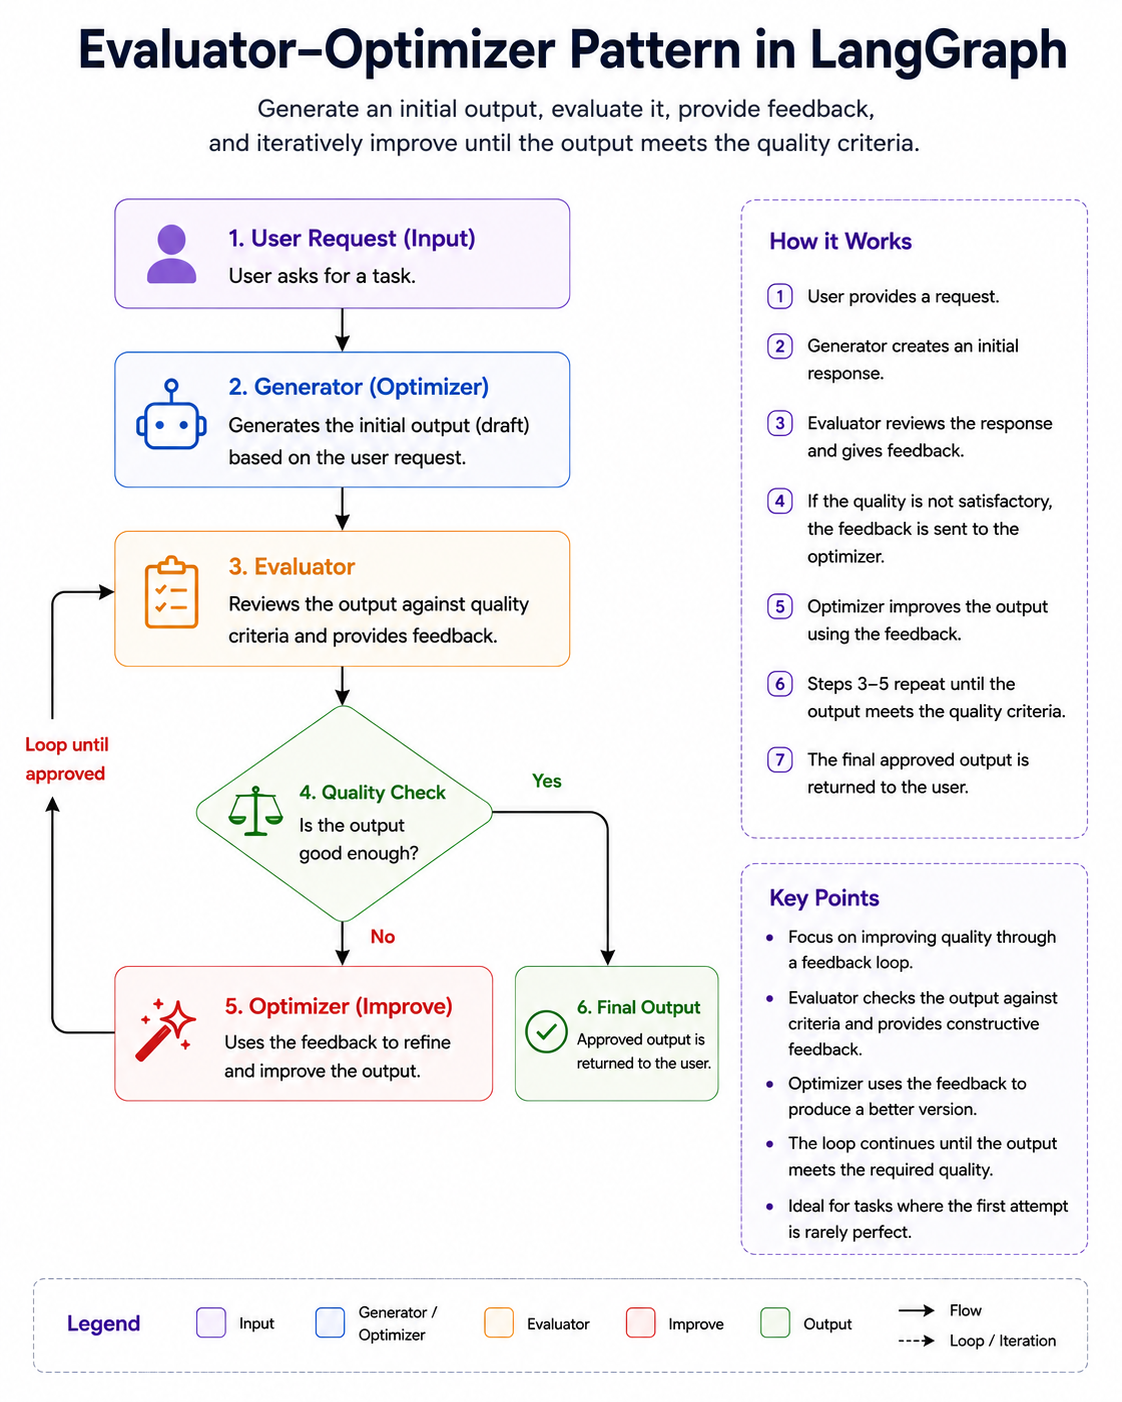
5. Evaluator-Optimizer Pattern
Some problems cannot be solved effectively in a single attempt. Even when a powerful LLM generates a reasonable answer, the first response is often incomplete, inconsistent, poorly structured, or missing important details. In many situations, the best results emerge through a process of evaluation, feedback, and refinement rather than from a single generation step.
The Evaluator-Optimizer pattern is designed specifically for these scenarios.
Instead of generating an answer and immediately returning it to the user, the workflow introduces a second component whose responsibility is to review the generated output and determine whether it meets the required quality standards. If the output is not satisfactory, feedback is provided and the content is improved through another iteration.
This pattern closely resembles how humans work. When writing an article, preparing a presentation, or creating a software design document, we rarely produce a perfect result on the first attempt. We typically create an initial draft, review it, identify weaknesses, make improvements, and repeat the process until we are satisfied with the outcome. The Evaluator-Optimizer pattern applies the same idea to AI workflows.
Understanding the Roles
The pattern consists of two primary components.
Generator (Optimizer)
The generator creates the initial solution.
For example: "Write a blog article about Kubernetes."
The generator produces a first draft.
Evaluator
The evaluator acts as a reviewer. Instead of creating content, it analyzes the generated output and identifies problems.
Typical evaluation questions might include:
- Is the article accurate?
- Are important topics missing?
- Is the structure logical?
- Is the writing clear?
- Does the content satisfy the requirements?
The evaluator returns feedback rather than a final answer.
Example: Coding Assistant
Imagine an AI coding assistant generating a Spring Boot API.
The workflow might look like:
User Request
      ↓
Generate Code
      ↓
Evaluate Code
      ↓
Missing Error Handling?
      ↓
Improve Code
      ↓
Evaluate Again
      ↓
Approved
The evaluator might check:
- Does the code compile?
- Are exceptions handled?
- Are validation annotations present?
- Is the design aligned with best practices?
Rather than accepting the first generated version, the workflow continuously improves the solution.
Iterative Improvement Loop
One of the defining characteristics of this pattern is the presence of a loop.
          ┌─────────────┐
          │  Generator  │
          └──────┬──────┘
                 ↓
            Draft Output
                 ↓
          ┌─────────────┐
          │ Evaluator   │
          └──────┬──────┘
                 ↓
        Approved?
          /     \
        No       Yes
        ↓         ↓
   Feedback      End
        ↓
   Generator
The workflow continues until one of the following occurs:
- The evaluator approves the output.
- A maximum iteration limit is reached.
- A predefined quality score is achieved.
This loop is what differentiates the Evaluator-Optimizer pattern from simple Prompt Chaining.
When Should You Use the Evaluator-Optimizer Pattern?
This pattern is most useful when:
- Output quality is more important than speed.
- Multiple revisions may be required.
- The task involves subjective judgment.
- Feedback can improve the result.
- There is no single correct answer.
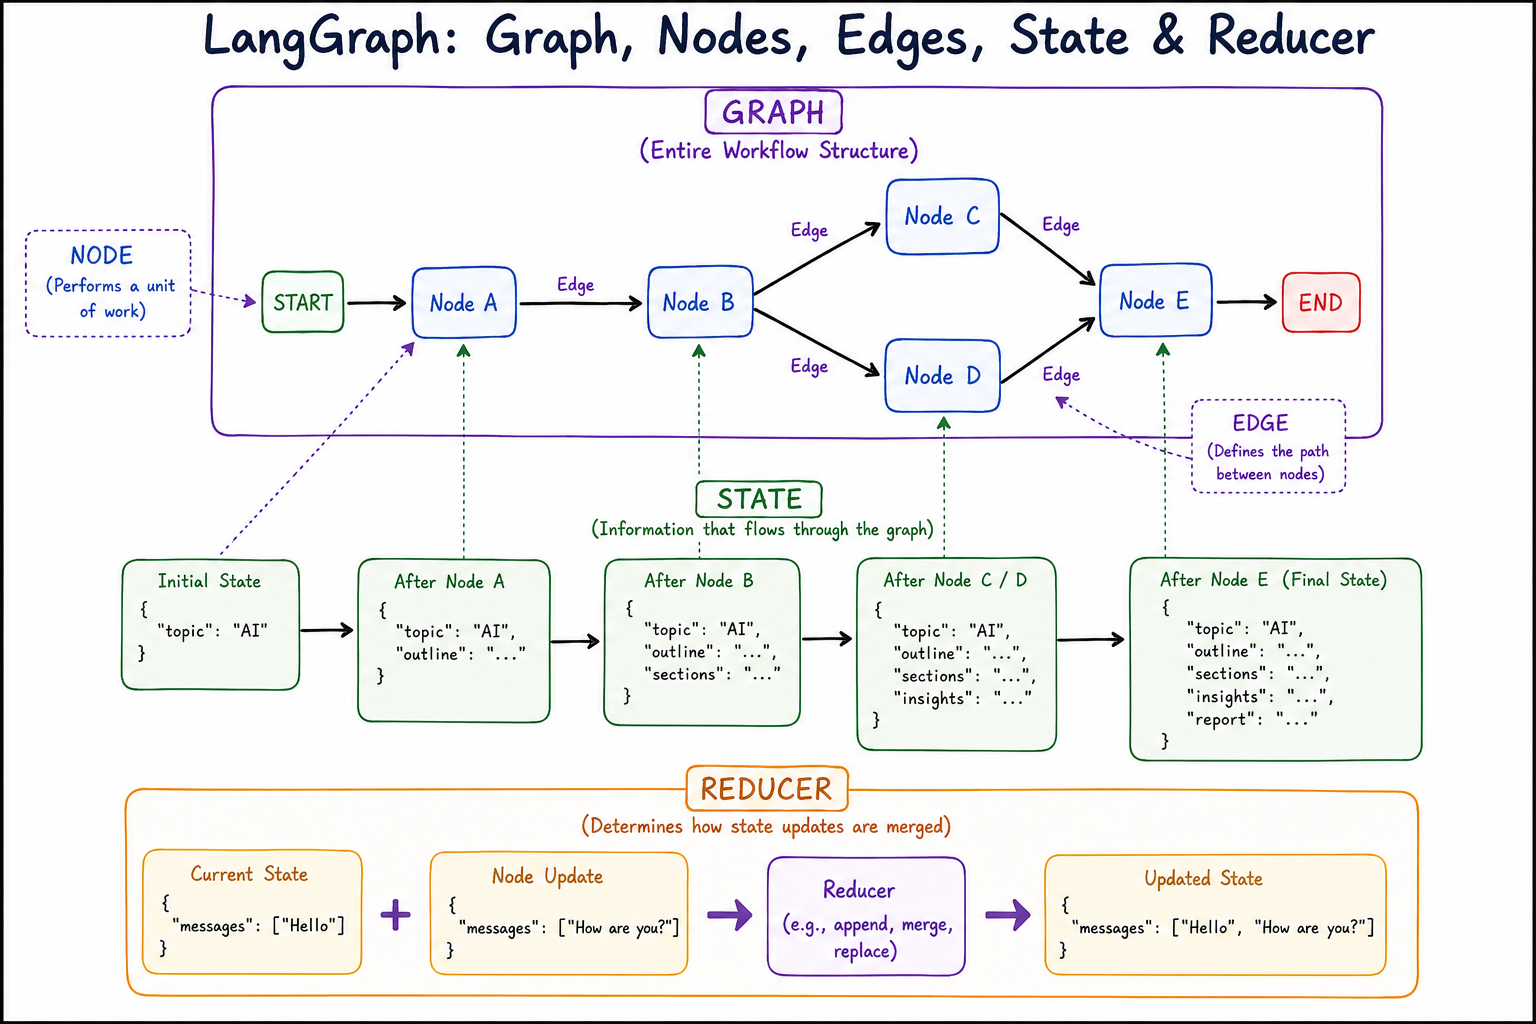
Graphs, Nodes, and Edges
Before learning about state management, reducers, execution flow, or agent orchestration, it is essential to develop a strong understanding of graphs, nodes, and edges because these concepts form the foundation upon which the entire LangGraph framework is built. Almost every feature that LangGraph provides, whether it is routing, parallel execution, evaluator loops, orchestrator-worker systems, or multi-agent collaboration, ultimately relies on the same underlying graph structure.
Many developers encounter LangGraph after working with LangChain chains or traditional application development patterns. Because of this background, they often think about workflows as a sequence of steps that execute one after another. While this mental model works well for simple processes, it becomes increasingly difficult to manage as workflows become more dynamic and intelligent.
Consider a traditional workflow for generating a report.
Receive Request
      ↓
Research Topic
      ↓
Generate Report
      ↓
Return Result
This workflow is linear. Every request follows exactly the same path regardless of its complexity or content. Such an approach works well when the process never changes, but modern AI systems frequently need to make decisions, execute tasks simultaneously, retry failed operations, or route requests to specialized components. A simple sequence of steps cannot easily represent these behaviors.
LangGraph addresses this limitation by representing workflows as graphs instead of chains. Rather than viewing an application as a straight line of execution, LangGraph encourages you to think of it as a network of connected tasks where execution can move in different directions depending on the current situation. This graph-based approach provides the flexibility required for building sophisticated AI systems.
Understanding the Concept of a Graph
At a high level, a graph is simply a collection of connected entities. If you have ever looked at a city map, a transportation network, or a social network diagram, you have already seen graphs in action.
Imagine a railway network connecting several cities.
Mumbai ───── Pune
   │
   │
Nashik ───── Aurangabad
Each city represents a location, while the railway tracks represent connections between locations. A traveler can move from one city to another by following the available routes.
LangGraph uses the same fundamental idea, except that instead of cities, we have tasks, and instead of railway tracks, we have execution paths.
Understand Query ───── Search Data
         │
         │
      Generate Answer
The workflow can move from one task to another just as a traveler moves between cities. This simple idea forms the foundation of every LangGraph application.
Nodes: The Building Blocks of a Workflow
Once we understand what a graph is, the next concept to explore is the node.
A node represents a unit of work within the workflow. Every meaningful operation that the system performs is usually represented by a node. Whenever the workflow needs to execute some logic, call an LLM, invoke a tool, perform a calculation, or make a decision, that operation typically becomes a node in the graph.
For example, imagine a question-answering system.
A user submits the following query:
"What are the benefits of Kubernetes?"
The workflow might need to perform several tasks before generating the final answer.
Receive Query
      ↓
Retrieve Information
      ↓
Generate Response
      ↓
Validate Response
Each of these tasks can be represented as a separate node.
The important thing to understand is that a node does not represent data. A node represents work. It is an active component that receives information, performs some operation, and produces an updated result.
One useful analogy is to think of nodes as employees working inside a company. Each employee has a specific responsibility. One employee might collect information, another might analyze it, and another might prepare a final report. Individually they perform different tasks, but together they contribute to achieving a larger goal. A LangGraph workflow operates in a very similar manner. Each node focuses on a specific responsibility, allowing the overall system to remain modular, maintainable, and easy to understand.
What Happens Inside a Node?
Although nodes can represent many different kinds of operations, they generally follow the same pattern. A node receives the current workflow state, performs its assigned work, and then returns updates to that state.
Conceptually, the process looks like this:
Current State
       ↓
      Node
       ↓
Updated State
For example, consider a node responsible for generating an outline for an article.
The workflow state might initially contain:
{
    "topic": "Artificial Intelligence",
    "outline": None
}
The node receives this information, generates an outline, and updates the state.
{
    "topic": "Artificial Intelligence",
    "outline": [
        "Introduction",
        "Applications",
        "Benefits",
        "Challenges",
        "Future Trends"
    ]
}
The updated state is then passed to the next node in the workflow.
From a coding perspective, a node is often implemented as a simple function, but conceptually it is more useful to think of it as a worker that performs a specific job within the larger system.
Different Types of Nodes
Although every node represents work, not all nodes perform the same kind of work. As workflows become more sophisticated, different categories of nodes begin to emerge.
Some nodes are responsible for interacting with Large Language Models. These nodes generate text, summarize information, answer questions, or perform reasoning tasks.
Other nodes act as tool executors. Instead of generating content, they may query a database, perform a web search, call an external API, or retrieve documents from a vector store.
There are also decision-making nodes whose primary responsibility is determining what should happen next. These nodes are commonly found in routing workflows where the system must choose between multiple execution paths.
Finally, evaluation nodes are frequently used in iterative workflows. Their purpose is not to generate content but to review previously generated outputs and determine whether they satisfy certain quality criteria.
Although these nodes perform very different jobs, they all share the same fundamental characteristic: they receive state, perform work, and return updated state.
Edges: Connecting the Workflow Together
While nodes perform the work, edges determine how the work flows through the system.
An edge is simply a connection between two nodes that defines the next step in the workflow. Without edges, nodes would exist as isolated components with no way to communicate or coordinate with each other.
Imagine that we have two nodes:
Generate Outline

Generate Report
Simply placing these nodes next to each other does not tell us anything about execution order. The workflow has no idea which task should happen first.
An edge provides this missing information.
Generate Outline
         │
         ▼
Generate Report
Now the workflow understands that the outline must be generated before the report can be written.
In other words, nodes define what work is performed, while edges define when and where that work is performed.
This distinction is extremely important because it helps separate business logic from workflow control. Nodes focus on solving problems, while edges focus on directing execution.
Why Graphs Are More Powerful Than Chains
The true strength of LangGraph becomes apparent when we combine nodes and edges into a complete graph.
A traditional chain might look like this:
A → B → C → D
There is only one possible execution path.
Graphs, however, can represent much richer workflows.
          Router
         /      \
        /        \
Technical      Billing
A graph can branch into multiple paths, allowing different requests to follow different workflows.
Graphs can also support parallel execution.
             Analyze Resume
                   ↓
        ┌──────────┼──────────┐
        ↓          ↓          ↓
    Skills     Experience  Communication
    Analysis    Analysis     Analysis
Multiple nodes can execute simultaneously and later combine their results.
Perhaps most importantly, graphs can support loops.
Generate Draft
       ↓
Evaluate Draft
       ↓
 Approved?
   /     \
 Yes      No
  ↓        ↓
 End   Improve Draft
             ↓
      Evaluate Draft
This ability to revisit earlier nodes is one of the reasons LangGraph is particularly well suited for agentic AI systems, where iterative reasoning and self-correction are common requirements.
Bringing Everything Together
A useful way to think about LangGraph is as a transportation network for information. The nodes represent stations where work is performed, the edges represent the routes connecting those stations, and the workflow state acts like a passenger traveling through the network.
As the state moves from node to node, work is performed, information is updated, decisions are made, and the workflow gradually progresses toward its final goal.
           Start
              ↓
      Understand Query
              ↓
          Router
         /      \
        /        \
   Search      Database
      \          /
       \        /
        Generate Answer
              ↓
             End
Once you develop this mental model, many of LangGraph's advanced concepts become much easier to understand. Routing is simply choosing different edges. Parallelization is simply executing multiple connected nodes simultaneously. Evaluator-Optimizer patterns are simply graphs containing loops. Orchestrator-Worker systems are simply graphs where one node dynamically creates and coordinates other nodes.
Understanding State in LangGraph
After understanding graphs, nodes, and edges, the next concept you should learn is state, because state is what transforms a collection of connected nodes into an intelligent workflow.
Many beginners initially focus on nodes and edges because they are easy to visualize. A node performs work, an edge determines where execution goes next, and together they form a graph. However, if we remove state from the picture, the workflow becomes surprisingly limited. Nodes would execute independently, but they would have no reliable way to share information with each other.
To understand why state is so important, imagine a relay race. Each runner receives a baton from the previous runner, runs their portion of the race, and then passes the baton to the next runner. The baton carries the progress of the race from one participant to another.
In LangGraph, state plays a very similar role.
State is the shared data that flows through the graph and carries information from one node to another.
Every node receives the current state, performs its work, updates the state, and then passes the updated state to the next node. This continuous flow of information is what allows the workflow to behave as a coordinated system rather than a collection of isolated tasks.
Why Do We Need State?
To appreciate the importance of state, consider a simple report-generation workflow.
User Topic
     ↓
Generate Outline
     ↓
Generate Sections
     ↓
Generate Final Report
Suppose the user provides:
Artificial Intelligence in Healthcare
The first node generates an outline. The second node generates detailed sections. The third node combines everything into a final report.
A natural question arises:
How does the "Generate Sections" node know what outline was generated by the previous node?
Similarly:
How does the "Generate Final Report" node know what sections were generated?
The answer is state.
The outline generated by the first node is stored in the workflow state. The second node reads that information, performs its work, and stores additional information in the same state. The third node then uses everything that has been accumulated so far.
Without state, every node would have to start from scratch.
Thinking of State as Shared Memory
One of the easiest ways to understand state is to think of it as shared memory for the workflow. Imagine a whiteboard in a meeting room. Several team members enter the room one after another.
The first person writes:
Project: Customer Support Chatbot
The second person enters later and adds:
Architecture: Microservices
The third person adds:
Database: PostgreSQL
Although each person performs their work independently, everyone contributes to the same shared whiteboard. State works in exactly the same way.
Each node can:
- Read information from the state.
- Add new information to the state.
- Modify existing information.
- Pass the updated state to future nodes.
Because all nodes share access to the same state, they can collaborate effectively.
What Does State Actually Look Like?
In most LangGraph applications, state is represented as a structured object containing the information that the workflow needs.
For example:
{
    "topic": "Artificial Intelligence",
    "outline": None,
    "sections": None,
    "final_report": None
}
Initially, only the topic is known. As the workflow executes, the state evolves.
After the outline generation node:
{
    "topic": "Artificial Intelligence",
    "outline": [
        "Introduction",
        "Applications",
        "Benefits",
        "Challenges",
        "Future Trends"
    ],
    "sections": None,
    "final_report": None
}
After the section generation node:
{
    "topic": "Artificial Intelligence",
    "outline": [...],
    "sections": {...},
    "final_report": None
}
After the report generation node:
{
    "topic": "Artificial Intelligence",
    "outline": [...],
    "sections": {...},
    "final_report": "Completed Report"
}
Notice how the state gradually accumulates information as the workflow progresses. This evolving state becomes the memory of the workflow.
Reducers: Controlling How State Gets Updated
As a LangGraph workflow executes, different nodes continuously produce updates to the workflow state. A natural question arises: when a node returns new data, how should that data be combined with the existing state? This is the problem that reducers solve.
A reducer is a mechanism that determines how state updates are merged into the current state. In simple workflows, this might seem unnecessary because the latest value can simply replace the old value. For example, if a node updates a status field from "Pending" to "Completed", replacing the previous value is exactly what we want. However, many AI workflows require more sophisticated behavior.
Consider a chatbot maintaining conversation history. If every new message simply replaced the previous one, the chatbot would immediately lose context and forget earlier parts of the conversation. Instead of replacing the existing messages, we want to append new messages to the conversation history. Similarly, in a parallel workflow, multiple nodes may execute simultaneously and return different results. If each update overwrites the others, valuable information will be lost. A reducer ensures that all updates are combined correctly and preserved.
You can think of a reducer as a merge strategy for state updates. Some reducers replace values, some append new items to an existing collection, and others merge data coming from multiple branches of the workflow. This becomes especially important in LangGraph because state is continuously flowing through the graph, and multiple nodes may contribute information at different stages of execution.
A useful way to remember the relationship between state and reducers is:
State stores information, while reducers determine how that information evolves over time.
Without reducers, state updates would simply overwrite one another. With reducers, LangGraph can safely maintain conversation history, combine outputs from parallel nodes, collect findings from multiple agents, and preserve the context required for complex AI workflows.
LangGraph Execution Model
Up to this point, we have discussed graphs, nodes, edges, state, and reducers as individual concepts. However, a LangGraph application does not simply consist of these components sitting independently. The real magic happens when all of these pieces work together during execution. Understanding the LangGraph execution model helps us answer an important question:
Once a graph is defined, how does LangGraph actually run it?
The execution model describes how LangGraph moves through the graph, how state is passed between nodes, how updates are applied, and how the workflow eventually reaches completion.
A useful way to think about execution is to imagine a package delivery system. The graph represents the delivery network, nodes represent processing centers, edges represent routes between centers, and the state represents the package being transported. As the package moves through the network, each processing center performs some work, updates the package, and forwards it to the next destination. LangGraph follows a very similar approach when executing workflows.
Step 1: Graph Definition
Execution begins long before the workflow actually runs. The first step is defining the graph structure itself.
At this stage, we specify:
- The workflow state
- The nodes that perform work
- The edges that connect nodes
- The entry point
- The exit point
Conceptually, we are creating a blueprint of the workflow.
For example:
Start
   ↓
Generate Outline
   ↓
Generate Sections
   ↓
Generate Report
   ↓
End
At this stage, nothing has executed yet. We are simply describing how the workflow should behave when execution eventually begins.
Step 2: Graph Compilation
After the graph has been defined, LangGraph compiles it.
Many beginners assume compilation simply converts the graph into executable code, but it actually serves a much more important purpose. During compilation, LangGraph validates the workflow structure and ensures that the graph is logically correct before execution starts.
For example, LangGraph can detect issues such as:
- Missing entry points
- Invalid edges
- Unreachable nodes
- Incorrect state definitions
- Structural inconsistencies
You can think of compilation as a safety inspection that takes place before the workflow is allowed to run.
Graph Definition
        ↓
   Compilation
        ↓
Validated Graph
Only after successful compilation does the graph become executable.
Step 3: Initial State Injection
Every workflow starts with an initial state.
For example, in a report generation workflow, the initial state might look like:
{
    "topic": "Artificial Intelligence",
    "outline": None,
    "report": None
}
This initial state becomes the starting context for the entire workflow.
The first node receives this state and begins processing.
Initial State
       ↓
 First Node
From this point forward, state continuously flows through the graph.
Step 4: Node Execution
When a node becomes active, LangGraph passes the current state to that node. The node performs its work and returns state updates.
For example:
Current state:
{
    "topic": "Artificial Intelligence"
}
The "Generate Outline" node executes and returns:
{
    "outline": [
        "Introduction",
        "Applications",
        "Challenges"
    ]
}
LangGraph then uses reducers to merge these updates into the existing state.
Updated state:
{
    "topic": "Artificial Intelligence",
    "outline": [
        "Introduction",
        "Applications",
        "Challenges"
    ]
}
The workflow is now ready to move forward.
Step 5: Message Passing
One of the most important concepts in LangGraph's execution model is message passing.
After a node finishes execution, it does not directly call the next node. Instead, the updated state is passed through the graph to whichever nodes are connected by outgoing edges.
Conceptually:
Node A
   ↓
Updated State
   ↓
Node B
The updated state acts as the message being passed through the workflow. This message contains everything the next node needs in order to continue processing. For this reason, you can think of state as the communication mechanism that allows nodes to collaborate.
Step 6: Reducer Application
Whenever a node produces updates, LangGraph must merge those updates into the existing state. This is where reducers become part of the execution model.
Suppose the current state contains:
{
    "messages": [
        "Hello"
    ]
}
A node returns:
{
    "messages": [
        "How are you?"
    ]
}
The reducer determines how these values should be combined.
Result:
{
    "messages": [
        "Hello",
        "How are you?"
    ]
}
Without reducers, LangGraph would have no reliable way to manage evolving state, especially in workflows involving multiple branches.
Understanding Supersteps
The execution model becomes more interesting when parallel branches are introduced.
Consider the following graph:
          Analyze Resume
                 ↓
       ┌─────────┼─────────┐
       ↓         ↓         ↓
   Skills    Experience Communication
   Analysis    Analysis    Analysis
After the first node completes, three nodes become eligible to execute.
The important question becomes:
Does LangGraph execute them one at a time or together?
The answer is that LangGraph groups simultaneously executable nodes into what is known as a superstep. A superstep is a collection of nodes that can execute concurrently because they do not depend on one another.
For example:
Superstep 1
-----------
Analyze Resume

Superstep 2
-----------
Skills Analysis
Experience Analysis
Communication Analysis

Superstep 3
-----------
Final Evaluation
All nodes inside a superstep can execute simultaneously. Only after every node in the current superstep finishes does LangGraph move to the next superstep.
This approach ensures that parallel execution remains predictable and that state updates are merged correctly before the workflow proceeds.
Conditional Execution
The execution model also supports dynamic decision-making.
Consider a routing workflow.
            Router
           /      \
          /        \
 Technical      Billing
The router executes first. Based on the current state, it decides which path should be followed.
For example:
{
    "query": "My refund is delayed"
}
The router may determine:
Route → Billing
As a result, only the Billing branch becomes active. The Technical branch is skipped. This ability to activate different parts of the graph based on runtime information is one of the reasons LangGraph is so flexible.
Loop Execution
Unlike traditional chains, LangGraph also supports cycles.
Consider an Evaluator-Optimizer workflow.
Generate Draft
       ↓
Evaluate Draft
       ↓
 Approved?
   /      \
 Yes       No
  ↓         ↓
 End   Improve Draft
             ↓
      Evaluate Draft
When the evaluator rejects the output, execution does not terminate. Instead, the graph routes execution back to an earlier node. The workflow continues looping until the approval condition is satisfied. This looping behavior is a natural part of the execution model and is one of the key reasons LangGraph is well suited for agentic AI systems.
The Complete Execution Flow
Putting everything together, the execution process typically follows this sequence:
Define Graph
      ↓
Compile Graph
      ↓
Provide Initial State
      ↓
Execute Node
      ↓
Apply Reducers
      ↓
Pass Updated State
      ↓
Execute Next Node(s)
      ↓
Repeat Until End
Throughout execution:
- Nodes perform work.
- State carries information.
- Reducers merge updates.
- Edges determine the next destination.
- Supersteps enable parallel execution.
- Conditional edges enable dynamic routing.
- Loops enable iterative refinement.