Building Conditional Workflows In LangGraph
Understanding Dynamic Decision Making in AI Workflows
Until now, every workflow we have built in LangGraph has followed a predictable execution path. We started from the START node, executed one node after another, and finally reached the END node. Regardless of the input, every node was executed in exactly the same order.
This type of workflow is known as a linear workflow. Linear workflows are simple to understand and are suitable when every request requires the same sequence of operations.
However, real-world AI applications rarely behave this way.
Imagine you are building an AI-powered customer support system. One customer asks for a refund, another reports a login issue, while a third wants to update their subscription plan. If every request follows the same processing path, the workflow becomes inefficient because not every request requires the same operations.
Instead, the workflow should examine the incoming request and decide what to do next. A refund request should be sent to the billing department, a technical issue should be handled by the support team, and an account-related request should be forwarded to the account management service.
This ability to choose different execution paths based on the current state of the workflow is called a conditional workflow.
Rather than executing every node, the workflow dynamically decides which node should run next.
This makes the workflow far more intelligent and closely resembles how humans make decisions.
Why Do We Need Conditional Workflows?
Let's understand this with a simple example. Suppose you have built an AI assistant that processes customer support tickets. Every ticket contains a short description written by the customer.
Some example tickets might be:
- I paid twice for my subscription.
- I cannot log in to my account.
- Please cancel my membership.
- Where can I download my invoice?
Now imagine processing every ticket using the same workflow.
START
   │
   ▼
Billing Team
   │
   ▼
Technical Team
   │
   ▼
Account Team
   │
   ▼
END
Although this workflow works, it is clearly inefficient. A customer reporting a login issue does not need the billing department. Similarly, a customer requesting an invoice does not need the technical support team. Most of the nodes execute unnecessarily, increasing both execution time and resource usage. As AI workflows become larger, this unnecessary processing becomes even more expensive. Instead, the workflow should make a decision immediately after reading the customer request. If the ticket is related to billing, it should directly execute the billing node. If the ticket is related to technical support, it should directly execute the technical node. If the ticket is about account management, it should skip the other nodes and execute only the account node. This is exactly what conditional workflows allow us to do.
From Static Workflows to Dynamic Workflows
A linear workflow always follows one predefined path.
START
   │
   ▼
Node A
   │
   ▼
Node B
   │
   ▼
Node C
   │
   ▼
END
Every execution looks identical. No decisions are made during execution. A conditional workflow, however, behaves differently. Instead of immediately moving to the next node, the workflow first evaluates the current state and decides which path should be followed.
                 START
                    │
                    ▼
             Read Customer Ticket
                    │
                    ▼
             Decide Next Step
          ┌─────────┼─────────┐
          │         │         │
          ▼         ▼         ▼
      Billing   Technical   Account
          │         │         │
          └─────────┼─────────┘
                    ▼
                   END
Notice something important here. The workflow no longer has a single fixed path. Instead, the execution path depends entirely on the data available at runtime. This ability to change the execution path while the workflow is running is what makes LangGraph extremely powerful for building AI agents.
What Exactly Is a Conditional Workflow?
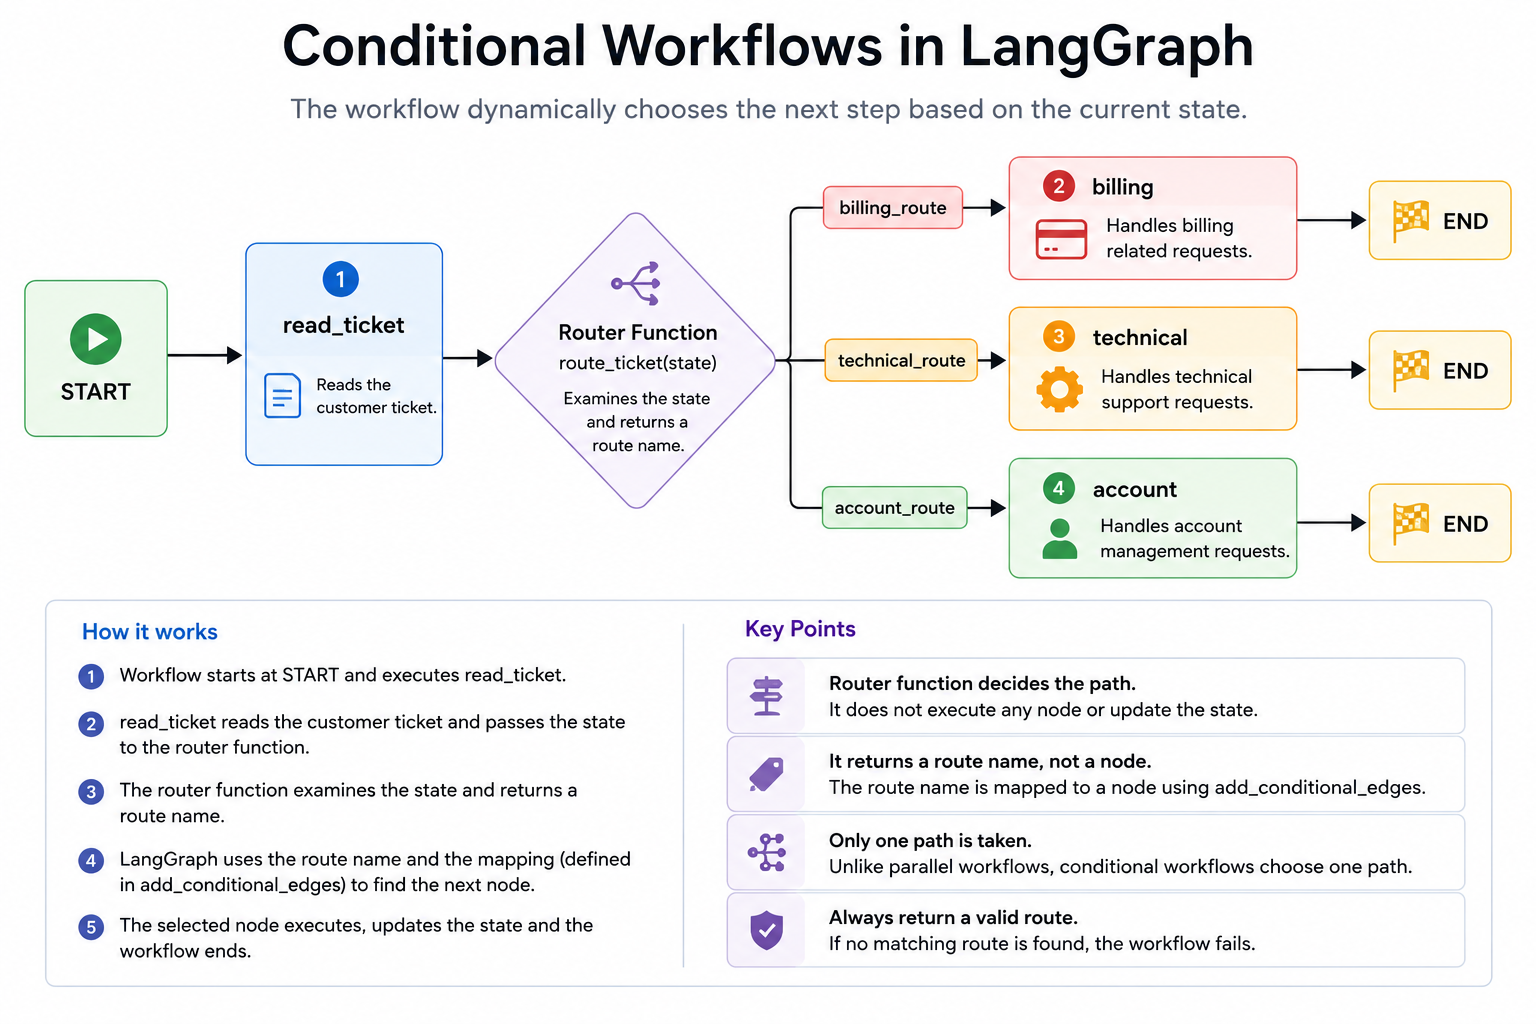
A conditional workflow is a workflow in which the next node is not predetermined. Instead, LangGraph evaluates a condition and selects the appropriate node during execution.
Think of it like driving a car using GPS. You start from your home and begin driving toward your destination. After a few kilometers, you reach a road intersection. Now you have multiple possible roads.
Which road should you choose?
The answer depends on the current traffic conditions. If Road A has heavy traffic, the GPS suggests Road B. If Road B is closed, it suggests Road C. The destination remains the same, but the route changes dynamically. Conditional workflows operate in exactly the same way. The workflow reaches a decision point, examines the current state, and determines which path should be taken next.
How Does LangGraph Make These Decisions?
You might wonder:
Who actually decides which node should execute next?
The answer is surprisingly simple. A normal Python function makes this decision. LangGraph calls this function a router function.
Unlike regular nodes, whose responsibility is to process data, a router function has only one job, decide the next destination. You can think of it as a traffic police officer standing at a busy intersection.
Cars arrive from one direction. The traffic officer looks at each vehicle and immediately signals which road it should take.
The officer does not drive the vehicles. The officer does not modify the vehicles. The officer simply directs them toward the correct road.
A router function behaves in exactly the same manner. It examines the workflow state and returns the name of the next route.
A Real-World Example
Let's revisit our customer support system. Suppose a customer submits the following request.
I paid twice for my subscription.
The workflow first reads the ticket. After reading the ticket, it must decide which department should handle it. Conceptually, the execution looks like this.
Customer Ticket
        │
        ▼
Read Ticket
        │
        ▼
Is this about payment?
        │
   Yes ─┴─ No
    │         │
    ▼         ▼
Billing   Check Next Condition
If the ticket contains payment-related information, the workflow immediately moves to the billing department. Otherwise, it continues evaluating other possible conditions. This decision-making process happens automatically every time the workflow executes.
Why Is This So Important for AI Agents?
Conditional workflows are one of the most important building blocks of modern AI agents. Most AI agents do not execute a fixed sequence of steps. Instead, they continuously make decisions. Consider an AI coding assistant.
A user asks:
"Find all TODO comments in my project."
The assistant might decide that searching the project files is sufficient. Now consider another request.
"Explain why my unit tests are failing."
This time, the assistant might decide to:
- Read the project files.
- Execute the test suite.
- Analyze the error messages.
- Explain the failure.
Although both requests were sent to the same AI assistant, the execution path is completely different. This dynamic behavior is possible because the workflow makes decisions at runtime.
Similarly, an AI travel assistant may decide to search flights, recommend hotels, or simply answer a factual question depending on the user's request. A customer support agent may choose to query a knowledge base, create a support ticket, or escalate the conversation to a human agent.
In all these scenarios, the workflow is not following a fixed script. Instead, it is continuously selecting the most appropriate path based on the current context. Without conditional workflows, AI agents would either execute many unnecessary steps or require separate workflows for every possible scenario. Conditional routing solves this problem by allowing a single workflow to adapt its behavior dynamically.
Linear Workflow vs Conditional Workflow
The differences between these two workflow styles become much clearer when viewed side by side.
| Linear Workflow | Conditional Workflow |
|---|---|
| Follows one fixed execution path | Chooses different paths during execution |
| Every node executes | Only the required nodes execute |
| No decision making | Makes decisions at runtime |
| Suitable for predictable processes | Suitable for dynamic AI applications |
| Easy to build | More flexible and scalable |
Neither approach is universally better than the other.
Linear workflows are ideal when every request requires the same sequence of operations. They are simple, predictable, and easy to debug.
Conditional workflows become valuable when different inputs require different processing paths. They reduce unnecessary work, improve efficiency, and enable intelligent decision making within a single workflow.
Choosing the right approach depends entirely on the problem you are trying to solve.
The Workflow We Are Going to Build
Suppose a company receives thousands of customer support tickets every day. Some examples are shown below.
I paid twice for my subscription.

I cannot log into my account.

Please cancel my membership.

Where can I download my invoice?
Instead of sending every ticket through the same processing pipeline, we want the workflow to decide which department should handle the request. Conceptually, our workflow looks like this.
                    START
                       │
                       ▼
              Read Customer Ticket
                       │
                       ▼
               Decide Next Step
           ┌───────────┼───────────┐
           │           │           │
           ▼           ▼           ▼
       Billing    Technical    Account
           │           │           │
           └───────────┼───────────┘
                       ▼
                      END
This diagram may look simple, but it introduces a completely new concept compared to the workflows we have built earlier. Notice that after reading the ticket, the workflow does not immediately know which node should execute next. Instead, it pauses, examines the current state, makes a decision, and only then continues execution. That decision-making step is the heart of a conditional workflow.
Step 1 – Defining the Workflow State
Like every LangGraph application, we begin by defining the state. The state represents the information that flows from one node to another during workflow execution. Each node can read values from the state, perform some processing, and return updates that become part of the shared state. For our workflow, we need to store three pieces of information:
- the customer ticket
- the detected category
- the generated response
Let's define the state.
from typing_extensions import TypedDict

class TicketState(TypedDict):
    ticket: str
    category: str
    response: str
Although this class is small, each field has a specific purpose. The ticket field contains the original customer request. Every node in the workflow can access this value. The category field stores the classification result. Initially, this field is empty. Later in the workflow, we will update it after determining the type of request.
Finally, the response field will contain the message generated by the department responsible for handling the ticket. If you have worked with the previous tutorials, you'll notice that nothing new has been introduced so far. The state works exactly the same way in conditional workflows as it does in linear workflows.
The difference appears only after we decide which node should execute next.
Step 2 – Creating the First Node
Every workflow needs an entry point. Our first node will simply receive the ticket and prepare it for routing. At first glance, this node might seem unnecessary because it does not modify the state. However, it serves an important purpose. It represents the point where the workflow receives the incoming request.
In a real-world application, this node might perform operations such as:
- validating the input,
- cleaning the text,
- removing unnecessary whitespace,
- translating the request into another language,
- or extracting metadata.
For simplicity, we only print the ticket. The important thing to understand is that after this node finishes executing, LangGraph must decide where to go next. Unlike a linear workflow, there is no predefined "next" node. Something has to make that decision. That "something" is the router function.
Step 3 – Understanding the Router Function
This is the most important concept in the entire tutorial. Many beginners assume that a router function is just another node. It isn't.
Although both are Python functions, their responsibilities are completely different. A normal node performs work. A router function makes decisions.
Consider the following analogy.
Imagine a large hospital. Patients arrive at the reception desk with different medical problems. The receptionist does not treat patients. Instead, the receptionist examines each patient's symptoms and decides which department they should visit. Someone with a broken arm is sent to orthopedics. Someone experiencing chest pain is sent to cardiology. Someone with vision problems is sent to ophthalmology. The receptionist never performs the medical treatment. The receptionist simply decides where each patient should go.
A router function plays exactly the same role. It examines the current workflow state and returns the name of the next route. Nothing more.
Step 4 – Writing the Router Function
Now let's implement our router.
def route_ticket(state: TicketState):

    ticket = state["ticket"].lower()

    if "payment" in ticket or "invoice" in ticket:
        return "billing"

    elif "login" in ticket or "password" in ticket:
        return "technical"

    else:
        return "account"
Notice something very important. The function does not return another function. It does not return a node object. It simply returns a string. That string represents a route name. One of the biggest misconceptions beginners have is believing that the router somehow executes the next node. It doesn't. The router only returns a decision. LangGraph performs the routing.
How Does LangGraph Use This String?
At this point, you may have an important question.
If the router simply returns the string
"billing"
how does LangGraph know which node to execute? The answer lies in the conditional edge mapping. Later in the tutorial, we will connect each returned string to a specific node. Conceptually, the mapping looks like this.
"billing"
        │
        ▼
 Billing Node

"technical"
        │
        ▼
Technical Node

"account"
        │
        ▼
Account Node
The router never directly calls these nodes.
Instead, LangGraph receives the returned string, searches the mapping, finds the corresponding node, and continues execution from there.
This separation of responsibilities keeps the router simple and the workflow easy to maintain. If you ever want to change where a route leads, you only need to update the mapping rather than rewriting the routing logic itself.
Step 5 – Creating the Processing Nodes
Now that the router can decide where the workflow should go, we need nodes that perform the actual work for each department.
Let's begin with the billing department.
def billing_node(state: TicketState):
    return {
        "category": "Billing",
        "response": "Your billing request has been forwarded to our billing team."
    }
This node updates two fields in the shared state. It records that the ticket belongs to the Billing category and prepares a response that will eventually be returned to the customer.
Next, we create the technical support node.
def technical_node(state: TicketState):
    return {
        "category": "Technical",
        "response": "Our technical support team will investigate your issue."
    }
Finally, we create the account management node.
def account_node(state: TicketState):
    return {
        "category": "Account",
        "response": "Your account-related request has been received."
    }
These nodes are intentionally simple because our focus is on understanding conditional routing. In a production application, each node could call external APIs, invoke an LLM, query a database, or perform any other business logic before updating the state.
Step 6 – Building the Graph
We now have everything we need to define the workflow:
- A shared state
- An entry node
- A router function
- Three processing nodes
The next step is to register these nodes with the graph.
from langgraph.graph import StateGraph, START, END

builder = StateGraph(TicketState)

builder.add_node("read_ticket", read_ticket)
builder.add_node("billing", billing_node)
builder.add_node("technical", technical_node)
builder.add_node("account", account_node)
At this stage, we have simply told LangGraph about the nodes that exist. We have not yet described how they are connected.
Step 7 – Connecting the Nodes
First, we connect the START node to the read_ticket node.
builder.add_edge(START, "read_ticket")
This works exactly the same way as in the linear workflows you built earlier. Every execution begins by reading the incoming ticket. Instead of adding a normal edge from read_ticket to another node, we now introduce a conditional edge.
builder.add_conditional_edges(
    "read_ticket",
    route_ticket,
    {
        "billing": "billing",
        "technical": "technical",
        "account": "account",
    },
)
This method is the key to conditional workflows. Let's examine each argument carefully. The first argument specifies the node from which the conditional routing should begin.
"read_ticket"
After this node finishes, LangGraph knows it must evaluate a routing decision rather than following a fixed edge.
The second argument is the router function.
route_ticket
LangGraph calls this function, passing it the current workflow state. The router analyzes the state and returns one of the predefined route names.
The third argument is a dictionary that maps each possible route name to a destination node.
{
    "billing": "billing",
    "technical": "technical",
    "account": "account",
}
If the router returns "billing", LangGraph follows the edge to the billing node. If it returns "technical", execution continues with the technical node, and so on.
This mapping is what bridges the gap between a simple string returned by the router and the actual node that executes next.
Completing the Workflow
Each processing node represents the end of its branch, so we connect all of them to the END node.
builder.add_edge("billing", END)
builder.add_edge("technical", END)
builder.add_edge("account", END)
At this point, the graph is complete. The workflow now has a single entry point, a routing decision, three possible execution paths, and a common exit.
Complete Program
from typing_extensions import TypedDict
from langgraph.graph import StateGraph, START, END


# --------------------------------------------------------
# Define the workflow state
# --------------------------------------------------------

class TicketState(TypedDict):
    ticket: str
    category: str
    response: str


# --------------------------------------------------------
# Entry node
# --------------------------------------------------------

def read_ticket(state: TicketState):

    print("\nReading customer ticket...")
    print(f"Ticket: {state['ticket']}")

    return {}


# --------------------------------------------------------
# Router function
# --------------------------------------------------------

def route_ticket(state: TicketState):

    ticket = state["ticket"].lower()

    if "payment" in ticket or "invoice" in ticket:
        return "billing_route"

    elif "login" in ticket or "password" in ticket:
        return "technical_route"

    else:
        return "account_route"


# --------------------------------------------------------
# Billing node
# --------------------------------------------------------

def billing_node(state: TicketState):

    print("Billing department processing the ticket...")

    return {
        "category": "Billing",
        "response": "Your billing request has been forwarded to our billing team."
    }


# --------------------------------------------------------
# Technical support node
# --------------------------------------------------------

def technical_node(state: TicketState):

    print("Technical support processing the ticket...")

    return {
        "category": "Technical",
        "response": "Our technical support team will investigate your issue."
    }


# --------------------------------------------------------
# Account management node
# --------------------------------------------------------

def account_node(state: TicketState):

    print("Account management processing the ticket...")

    return {
        "category": "Account",
        "response": "Your account-related request has been received."
    }


# --------------------------------------------------------
# Build the graph
# --------------------------------------------------------

builder = StateGraph(TicketState)

builder.add_node("read_ticket", read_ticket)
builder.add_node("billing", billing_node)
builder.add_node("technical", technical_node)
builder.add_node("account", account_node)


# --------------------------------------------------------
# Connect nodes
# --------------------------------------------------------

builder.add_edge(START, "read_ticket")


builder.add_conditional_edges(
    "read_ticket",
    route_ticket,
    {
        "billing_route": "billing",
        "technical_route": "technical",
        "account_route": "account",
    },
)


builder.add_edge("billing", END)
builder.add_edge("technical", END)
builder.add_edge("account", END)


graph = builder.compile()


# --------------------------------------------------------
# Invoke the workflow
# --------------------------------------------------------

initial_state = {
    "ticket": "I paid twice for my subscription.",
    "category": "",
    "response": "",
}

result = graph.invoke(initial_state)


print("\nFinal State")
print("-------------------------")
print(f"Category : {result['category']}")
print(f"Response : {result['response']}")
Sample output:
Reading customer ticket...
Ticket: I paid twice for my subscription.

Billing department processing the ticket...

Final State
-------------------------
Category : Billing
Response : Your billing request has been forwarded to our billing team.
What Happens if the Router Returns an Invalid Value?
From LangGraph's perspective, this creates an ambiguity. The router has made a routing decision, but the graph has no idea where that decision should lead.
Since no valid destination exists, the workflow cannot continue and the graph execution fails with an error.
Conceptually, the situation looks like this.
Router
   │
   ▼
returns "refund_route"
   │
   ▼
Route mapping
   │
   ▼
❌ No matching entry found
   │
   ▼
Workflow execution fails
Returning None
Another common mistake is returning None. For example,
def route_ticket(state):

    if "payment" in state["ticket"]:
        return "billing_route"

    return None
At first glance, this might seem harmless. Perhaps you intend to indicate that there is no matching route. However, None is not a valid route name.
When LangGraph receives None, it has no information about where execution should continue. Instead of stopping silently or choosing a default node, the graph raises an error because it cannot determine the next destination.
Whenever your router reaches the end of its logic, it should always return a valid route. A common approach is to include a default route.
def route_ticket(state):

    ...

    return "account_route"
Even if none of the earlier conditions match, the workflow still has a valid path to follow.
Best Practices for Building Router Functions
Now that we've seen what can go wrong, let's discuss some practices that make conditional workflows easier to understand, maintain, and debug.
Keep Router Functions Focused
A router should make decisions, nothing more. Avoid writing business logic inside the router. For example, this is not a good design.
def route_ticket(state):

    database.save_ticket(state)

    send_email(state)

    return "billing_route"
The router is now performing several unrelated responsibilities. Instead, keep the router focused solely on deciding the next path. Business logic belongs inside processing nodes. This separation makes the workflow much easier to understand and maintain.
Always Return Predictable Values
Every possible return value from the router should correspond to a valid route. Try to avoid situations where the returned value depends on arbitrary user input. For example,
return state["department"]
might appear convenient, but if the state contains an unexpected value, the workflow could fail because no corresponding route exists. Instead, normalize the decision before returning it.
if department == "billing":
    return "billing_route"

return "account_route"
This guarantees that only valid route names are produced.
Provide a Default Route
Real-world data is often messy. Users may submit requests that don't fit neatly into any predefined category. Rather than allowing the workflow to fail, provide a fallback route. For example,
return "account_route"
or
return "human_review_route"
A default route makes the workflow far more resilient because every execution has somewhere to go. Many production AI systems include a dedicated human review route for cases where the router cannot confidently classify a request.
Use Meaningful Route Names
Route names should clearly describe the decision being made.
Names such as
billing_route
technical_route
human_review_route
are much easier to understand than
route1
route2
route3
Descriptive names also make debugging easier because execution traces become much more readable.